2009-12-23

Flash development on Linux

Recently I am getting more and more interested in flash development. Since the adoption of actionscript 3 (as3) as programming language Flash is becoming more and more a serious option to develop applications

The main inconvenient that I find is the fact that the development tools are almost just available for the Windows environment. This is an operating system that I stopped using almost two years ago, and I do not have any intention to come back to such family of operating systems.

I am into free software, so I will try to do flash development based on open source tools as much as I can.

This is my development environment:
A four years old Pentium IV based computer, running a 32 bit version of Ubuntu 9.04


Eclipse (you will need to have Java -JRE- installed in order to run Eclipse)
AXDT: This is a set of plug-ins for the Eclipse platform that enables the user to write ActionScript3 code in such a framework.

We can start having a look at the installation instructions on the AXDT site.

The first step is to download the "Eclipse IDE for Java Developers". In our particular case, we will choose the 32bit Linux version (eclipse-java-galileo-linux-gtk.tar.gz)

Then we will have to uncompress that somewhere on our hard disk. We have chosen to install it on the /opt directory.


$ sudo tar -C /opt -xzf java-galileo-linux-gtk.tar.gz


After that, we launch the Eclipse application. First thing will be to choose the workspace directory. We can maintain the default option: just a directory called "workspace" under our home directory.

In the menu, we choose Help -> Install new software...

Click on the "Add..." button, and type the following:

Name: Eclipse IMP
Location: http://download.eclipse.org/technology/imp/updates


On the lower right corner of the main Eclipse window, you will see an indicator. The program is getting a list of available software components. Some seconds after that, it will show you those components. Do not choose anyone in this moment, and continue to the next step.

Name: AXDT
Location: http://update.axdt.org/


Choose (at least) the following packages:
Axdt AS3 Feature
Flex3SDK Feature
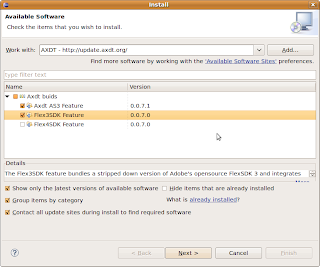


Then click on the "Next >" button, accept the licence and proceed to install the AXDT + Flex SDK framework.

If the system complains about unsatisfied dependencies or requirements, be sure to have installed the basic packages of the Eclipse base environment. I have found in some installations that such repositories are not initially enabled.

Name: Galileo
Location: http://download.eclipse.org/releases/galileo

Name: Eclipse project
Location: http://download.eclipse.org/eclipse/updates/3.5

Once installed, restart Eclipse

Go to the menu: Window -> Open perspective -> Other... -> AXDT
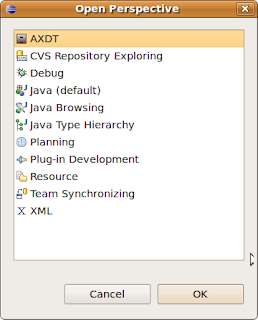


You are now ready to start to develop Flash / Flex programs on your Linux box. You can find a simple example of how to compile your first Flash program on Linux.

Flash development on Linux (II)

Once you have set up your Flash / Flex development environment on your Linux box, you are ready to compile your first application.

Open Eclipse with the AXDT perspective

Create your first project. This is done under the menu item File -> new -> AXDT project.... Give a name to your project and select a directory (usually under the directory that you chose as your workspace).
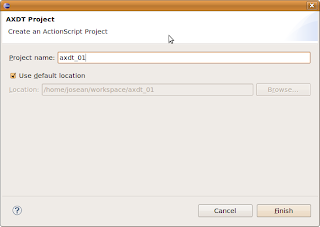


After the creation of the project, you can start to add your source files. The compiler supports both kind of files: as3 (ActionScript) as well as .mxml files. We are going to compile a sample from the AXDT site.

Go to the menu and choose File -> new -> AS3 file
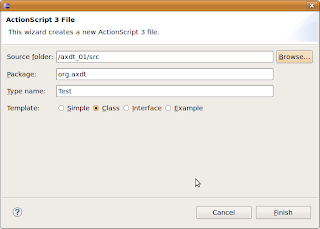


Choose the folder to store the source file (usually src). Optionally you can organise your code in packages. Using packages is optional but becomes more necessary as you project grows. Better being used to manage packages from the beginning. The sources will be placed in a subdirectory tree structure according to the package structure. Finally, give a name to your source file: As in many other OOP languages, the file name must be the same as the name of the class defined in such source file.

After the creation of the source file, write down (or copy + paste) the file contents. At this point, your environment should look more or less like this:
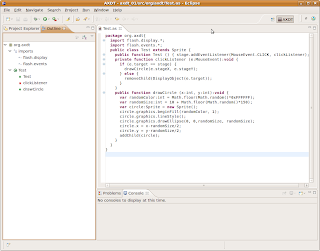


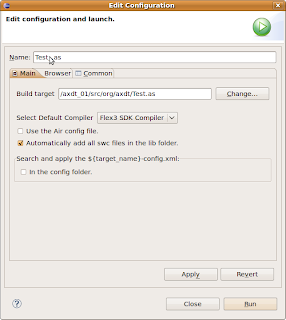
Once created and saved your source file, you can compile it. Just click on the menu item Run -> Run As -> Compile and Open a SWF File. You will see some options to configure the compiler but do not worry about such options right now. You can maintain the default values.


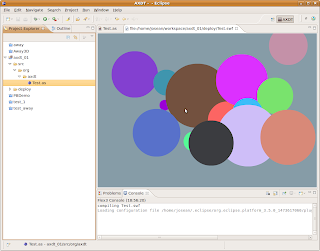
If everything has gone right, you will see your Flash application running on the Eclipse IDE . The swf file created will be placed on the target location (default is deploy), so you can copy such file and publish it on your website.
Flash Development on Linux (III): swc libraries

In this stage, we already know how to set up our Flash development environment on Linux, and how to compile basic programs in Flash (Actionscript).

If we intend to develop something a bit more advanced, it is very common to need precompiled libraries. These libraries are packaged in the form of .swc files, so we are going to know how to create such libraries, and how to use them once created.


The AXDT plugin form Eclipse includes a simplified version of the Flex SDK provided by Adobe. The SDK from Adobe includes additional tools, and in this scenario, in order to create a swc library, we need the component compiler (compc). This compiler can be found included with the Flex SDK tools.

The installation of such environment presents some minor difficulties that we are going to solve here:

First of all, we go to the Adobe website to download the open source Flex SDK. In this tutorial we have worked with the version 3.4.0.9271 (Aug 18, 2009)


$ sudo mkdir /opt/flex3

Then, we will choose an appropriate directory to unpack the compiler in such place. Notice the -a option: It is necessary in order to convert text files (CR/LF characters) properly.


$ sudo unzip -a -d /opt/flex3 flex_sdk_3.4.0.9271_mpl.zip

Optionally, you can remove the files on the bin directory intended for other platforms


$ sudo rm -f /opt/flex3/bin/*.exe /opt/flex3/bin/*.bat

Once uncompressed, we need to give the execution permissions to the files in the bin folder. The zip file definitely was created on a non-Linux system.


$ sudo chmod +x /opt/flex3/bin/*

To illustrate the usage of the component compiler, we are going to create the .swc library file corresponding to the Away3D library. Away3D is an open source flash 3D library which is quickly becoming one of the most popular Flash libraries on its field.

Once again, we download the source code of the library. Since we are developing for Flash 9, we download the 2.x version. If you intend to develop Flash 10 programs, you can go with the 3.x version. In our sample, we are working with the 2.4.0 version.

We create a directory for the library inside our workspace directory and uncompress there the away3D source code.


$ mkdir $HOME/workspace/away3d
$ unzip -a -d $HOME/workspace/away3d away3d_2_4_0.zip

The component compiler, apart from having a very limited documentation has a syntax a bit inconvenient. We can not indicate to the compiler to include all the classes under a directory tree, but we have to enumerate all the classes that we want to pack into the .swc file. In the case of the Away3D library, that means that the command line to invoke the compiler must contain the name of about 320 classes (including their package names).

To avoid that, we are going to create a compilation script in a more or less automated way. Since I am not an expert on shell scripts, suggestions on how to improve / ease this script are welcome.


$ cd $HOME/workspace/away3d
$ echo '/opt/flex3/bin/compc -compiler.source-path . -output ./away3d.swc -include-classes \' > compile_away3d
$ find . -name '*.as' | grep -v 'away3d/test' | sed -e 's/\.as/ \\/g' -e 's/\.\///g' -e 's/\//\./g' -e '$s/ \\//g' >> compile_away3d
$ chmod +x compile_away3d


The compile_away3d script file now has the command line necessary to compile the library, excluding the sample sources under the test directory. All we need to do right now is just to invoke the compilation script. Have a look inside it before if you are interested in a closer examination or do not worry about it if you just want to compile the library disregarding the details.


$ ./compile_away3d

Once in this step, if the compiler complains about a duplicate variable definition on the lensFlare.as file (line 118), everything is going right.

The as3 language manages the scope of the variables in a different manner than the usual one (as, for example in C++ or Java). Block scope does not exist, and the minimal scope for variables is the whole function. There is a bug related to that in the current latest stable version (2.4.0) of the Away3D library (the bug has already been corrected in the svn version), so we change a fragment of code in the lensFlare.as in order to avoid having a duplicate variable declaration. The change consists just in getting the variable declaration (ctVal) out of the conditions, and declare it just once.


if(useBurning && _burnClip)
{
var ctVal:Number;
if(_burnMethod == LensFlare.BURN_METHOD_BRIGHTNESS)
{
var bsVal:Number = 5*burnFactor/_projectionLength;
bsVal = bsVal < 1 ? 1 : bsVal;
bsVal = bsVal > 3 ? 3 : bsVal;
//TweenMax.to(_burnClip, 0, {colorMatrixFilter:{contrast:bsVal, brightness:bsVal}});
//TODO: setup colorMatrixFilter tween without TweenMax
ctVal = 500*burnFactor/_projectionLength;
_ct = new ColorTransform(1, 1, 1, 1, ctVal, ctVal, ctVal, 0);
_burnClip.transform.colorTransform = _ct;
}
else if(_burnMethod == LensFlare.BURN_METHOD_COLOR_TRANSFORM)
{
ctVal = 500*burnFactor/_projectionLength;
_ct = new ColorTransform(1, 1, 1, 1, ctVal, ctVal, ctVal, 0);
_burnClip.transform.colorTransform = _ct;
}
}


Now, the library compiles without any kind of problem. We will see the away3d.swc file (about 590KB size) on the current directory.

Resource: http://netpatia.blogspot.com/

Multiseat in Ubuntu 9.04

Multiseat configuration in Ubuntu 9.04 is very similar to that of Ubuntu 8.04. Some software components have been updated, so the overall system has some improvements over the previous version, while other problems are still remaining.


The computer is just identical to that used in the previous version:
Pentium 4 at 3GHz, 512MB of RAM and a 80GB hard disk. The video card is an ATI Radeon X300 PCIe by Gigabyte with two outputs (VGA and DVI). On the DVI output we have a DVI to VGA converter so we can connect two simple VGA analog monitors. The monitors are just two generic TFT/LCD displays with a resolution of 1280x1024.

1.- We install the Ubuntu 9.04 version on the computer. You can do this using a live-media, such as a live-CD/live-DVD or a live-USB. Since most of the computers today support booting from USB, we recommend you to choose the USB option. The installation process will be much faster compared to installing from a CD/DVD.

2.- Update your system to the latest available packages. You can do that either using the graphical tools (update manager / synaptic) or using the command line in a terminal:

$ sudo apt-get update


3.- Install some additional components (xserver-xephyr and wmctrl). These are not included in the default installation, but they are in the official repositories. These packages are necessary in order to obtain the desired multiseat system.


$ sudo apt-get install xserver-xephyr wmctrl


Before starting any modifications related to the multiseat configuration, you should do the necessary adjustments and setup for your particular scenario (network configuration, user creation, etc). Some tools and applications related to Gnome configuration do not work when the user is logged in a multiseat session, because the operating system detect multiple gnome-sessions and some of the system configuration tools are not able to create the necessary locks.

It is very convenient to maintain a copy of the original configuration of the two files (/etc/X11/xorg.conf and /etc/gdm/gdm.conf) that are going to be modified, since they can be necessary if you want to come back to the initial configuration.

Once configured your network and created your users (we suggest you creating something like user1/user2, uleft/uright if you are going to have generic users) you can proceed with the process of multiseat setup.


Initially, after the default installation, the system will start with the two displays in "clone" mode.
If we have a look at the output of the xrandr command, we will see the details about our current setup. In our particular case, we obtain this output:


$ xrandr -q
Screen 0: minimum 320 x 200, current 1280 x 1024, maximum 1280 x 1200
VGA-0 connected 1280x1024+0+0 (normal left inverted right x axis y axis) 338mm x 270mm
1280x1024 60.0*+ 75.0 60.0*
1152x864 75.0
1024x768 75.0 60.0
832x624 74.6
800x600 75.0 60.3
640x480 75.0 59.9
720x400 70.1
DVI-0 connected 1280x1024+0+0 (normal left inverted right x axis y axis) 338mm x 270mm
1280x1024 60.0*+ 75.0 60.0*
1152x864 75.0
1024x768 75.0 70.1 60.0
832x624 74.6
800x600 72.2 75.0 60.3
640x480 75.0 72.8 59.9
720x400 70.1
S-video disconnected (normal left inverted right x axis y axis)


Next thing, we edit /etc/X11/xorg.conf to indicate how to obtain an "extended desktop" configuration. If you have any doubts on this topic, you can find additional information on the official Ubuntu wiki: manual multihead setup.

On recent Linux versions, several things related to device management are being changed and moved to other parts of the system, such as hal and udev, so we can see that there is no need to indicate anything related to keyboard and mouse in the xorg.conf file.

After having done a backup of the original xorg.conf file, we modify it in order to indicate the new setup with two monitors. We also include some convenient options (section "ServerFlags") in a multiseat system.


Section "Device"
Identifier "Card0"
BoardName "ATI Technologies Inc RV370 5B60 [Radeon X300 (PCIE)]"
Driver "ati"
BusID "PCI:1:0:0"
Option "Monitor-VGA-0" "Mon-VGA"
Option "Monitor-DVI-0" "Mon-DVI"
EndSection

Section "Monitor"
Identifier "Mon-VGA"
Option "DPMS"
EndSection

Section "Monitor"
Identifier "Mon-DVI"
Option "DPMS"
Option "Below" "Mon-VGA"
EndSection

Section "Screen"
Identifier "Screen-base"
Device "Card0"
Monitor "Mon-VGA"
DefaultDepth 24
Subsection "Display"
Depth 24
Modes "1280x1024"
Virtual 1280 2048
EndSubSection
EndSection

Section "ServerFlags"
# Even if mouse detection fails, X will start
Option "AllowMouseOpenFail" "yes"

# VT switching is disabled
Option "DontVTSwitch" "yes"

# X restart (Ctrl+Alt+Backspace) is disabled
Option "DontZap" "yes"
EndSection


Notice that this time, we have defined a vertical setup of the monitors. This is just to test if 3D acceleration works with horizontal and vertical dimensions of the virtual screen lower (or equal) than 2048 pixels. If you feel more comfortable with an horizontal setup, just use leftOf or rightOf instead of below, and change the virtual size to the proper one according to the desired layout.

After having done this change, if we restart the X server we will see a vertical desktop with these characteristics:


$ xrandr -q
Screen 0: minimum 320 x 200, current 1280 x 2048, maximum 1280 x 2048
VGA-0 connected 1280x1024+0+0 (normal left inverted right x axis y axis) 338mm x 270mm
1280x1024 60.0*+ 75.0 60.0*
1152x864 75.0
1024x768 75.0 60.0
832x624 74.6
800x600 75.0 60.3
640x480 75.0 59.9
720x400 70.1
DVI-0 connected 1280x1024+0+1024 (normal left inverted right x axis y axis) 338mm x 270mm
1280x1024 60.0*+ 75.0 60.0*
1152x864 75.0
1024x768 75.0 70.1 60.0
832x624 74.6
800x600 72.2 75.0 60.3
640x480 75.0 72.8 59.9
720x400 70.1
S-video disconnected (normal left inverted right x axis y axis)


Once we have modified the xorg.conf file and having already obtained a big desktop covering the two monitors (either with an horizontal or with a vertical layout), the next thing is to configure gdm to launch two Xephyr sessions, one for every seat.

Previously, you will need to obtain the information related to the input events on your system.


$ ls -la /dev/input/by-path/ | grep event | grep kbd
lrwxrwxrwx 1 root root 9 2009-06-18 13:11 pci-0000:00:1d.2-usb-0:2:1.0-event-kbd -> ../event5
lrwxrwxrwx 1 root root 9 2009-06-18 13:11 platform-i8042-serio-0-event-kbd -> ../event3

$ ls -la /dev/input/by-path/ | grep event | grep mouse
lrwxrwxrwx 1 root root 9 2009-06-18 13:11 pci-0000:00:1d.2-usb-0:1:1.0-event-mouse -> ../event4
lrwxrwxrwx 1 root root 9 2009-06-18 13:11 platform-i8042-serio-1-event-mouse -> ../event8


In this case, we have a set of PS2 keyboard + mouse for one seat, and a pair of USB keyboard + mouse for the second one. The values that you are obtaining here will be used to configure the corresponding input device for every seat.

The next step is to create a launcher in order to execute Xephyr with the proper parameters and input events. To achieve that, we create a file that will be used as a launcher script. You can name the file and place it as you consider most appropriated. We have chosen to create it as /usr/sbin/Xephyr-path.sh

Use your favorite editor (vi, gedit, ...) to create it, and do not forget to make it executable by root (the file owner).


$ sudo gedit /usr/sbin/Xephyr-path.sh
$ sudo chmod 744 /usr/sbin/Xephyr-path.sh


You should create a file with something like these contents (change the xkblayout parameter according to your language):


$ cat /usr/sbin/Xephyr-path.sh


#!/bin/bash

# 200906 - josean
# http://netpatia.blogspot.com/

trap "" usr1

XEPHYR=/usr/bin/Xephyr
DISPLAY=:0
XAUTHORITY=/var/lib/gdm/:0.Xauth

args=()

while [ ! -z "$1" ]; do
if [[ "$1" == "-kbdpath" ]]; then
shift
if [ ! -z "$1" ]; then
args=("${args[@]}" "-keybd")
args=("${args[@]}" "evdev,,device=/dev/input/by-path/$1,xkbrules=xorg,xkbmodel=evdev,xkblayout=es")
fi
elif [[ "$1" == "-mousepath" ]]; then
shift
if [ ! -z "$1" ]; then
args=("${args[@]}" "-mouse")
args=("${args[@]}" "evdev,,device=/dev/input/by-path/$1")
fi
else
args=("${args[@]}" "$1")
# echo "+++ args $1 +++" >> /tmp/logXephyr
fi
shift
done

# Next line is just to create a log file with the invocation parameters, for debug purposes
echo $XEPHYR "${args[@]}" >> /tmp/logXephyr
exec $XEPHYR "${args[@]}"


After the creation of this script, you can proceed with the modifications to the /etc/gdm/gdm.conf file.
On the [servers] section of gdm.conf, we comment out the rules corresponding to the original layout and define the new one. We modify the file to create the base X server and two Xephyr sessions (one for every seat) over the base X.


# ****************************************************************************

[servers]

# 0=Standard
#
# Means that DISPLAY ":0" will start an X server as defined in the
# [server-Standard] section.

# ****************************************************************************

# Multiseat setup (200906)

0=Xephyr0
1=Xephyr1
2=Xephyr2

[server-Xephyr0]
name=Xephyr0
command=/usr/bin/X -br -dpms -s 0
handled=false
flexible=false

[server-Xephyr1]
name=Xephyr1
command=/usr/sbin/Xephyr-path.sh -br -screen 1280x1024 -kbdpath platform-i8042-serio-0-event-kbd -mousepath platform-i8042-serio-1-event-mouse
handled=true
flexible=false

[server-Xephyr2]
name=Xephyr2
command=/usr/sbin/Xephyr-path.sh -br -screen 1280x1024 -kbdpath pci-0000:00:1d.2-usb-0:2:1.0-event-kbd -mousepath pci-0000:00:1d.2-usb-0:1:1.0-event-mouse
handled=true
flexible=false

# ****************************************************************************


Notice that this is the script where you will have to indicate what the input devices (their physical connections) are for every seat.

The second change to the gdm.conf file is related to the greeter. There are still things that need to be done manually.

We encounter the already known problem of having every Xephyr window properly placed (one Xephyr session appearing on every display). The current Xephyr version does not support the geometry parameter that most X applications include, so it is not possible to place the Xephyr window in the desired place. In order to circumvent this problem, we create a script that will be called instead of doing a direct call to the session greeter. Such script invokes some command line tools in order to place every Xephyr window just in the place where we want to have it. We will use the following command line tools: xwininfo, wmctrl to move one of the Xephyr sessions to the second monitor, so that they do not overlap anymore. That is the reason why we installed the wmctrl package.

In the [daemon] section of gdm.conf change the reference to the original greeter for a reference to a new script. This script, apart for invoking the greeter, will place properly every Xephyr window:


# ****************************************************************************

[daemon]

# The greeter for attached (non-xdmcp) logins. Change gdmlogin to gdmgreeter
# to get the new graphical greeter.
# Greeter=/usr/lib/gdm/gdmgreeter
Greeter=/usr/sbin/Xephyr-login.sh

# ****************************************************************************


We will have to create the script responsible of the greeter/login (in our case, /usr/sbin/Xephyr-login.sh). This script will be executed by the gdm user, so we create a file owned by gdm and give execution permission just for that user.


$ sudo gedit /usr/sbin/Xephyr-login.sh
$ sudo chown gdm:gdm /usr/sbin/Xephyr-login.sh
$ sudo chmod 744 /usr/sbin/Xephyr-login.sh


After the creation of such script, it should look like this:


$ cat /usr/sbin/Xephyr-login.sh


#!/bin/bash
# /usr/sbin/Xephyr-login.sh

XAUTH_BASE=/var/lib/gdm/:0.Xauth
DISPL_BASE=:0

XEP=$(XAUTHORITY=$XAUTH_BASE xwininfo -root -children -display :0 | grep "Xephyr on :1" --max-count=1)
echo ${XEP} >> /tmp/logXephyrLogin

# assign values to positional parameters to obtain the id (first parameter) of the Xephyr window
set ${XEP}
DISPLAY=$DISPL_BASE XAUTHORITY=$XAUTH_BASE wmctrl -i -r $1 -e 0,0,1024,-1,-1
# echo $1 >> /tmp/logXephyrLogin_1

/usr/lib/gdm/gdmlogin


In our case, we move one of the sessions 1024 pixels vertically (remember that our layout consists of two 1280x1024 displays vertically aligned).

As you can see, when the greeter is expected to be invoked, the wrapper script (including greeter invocation) is executed instead. The user(s) finally sees every greeter in a different display and the rest of the process is almost unnoticeable.

The last comment is about the greeter. The old style gdmlogin was some time ago replaced by a more modern gdmgreeter. There is something wrong about screen size detection with this default gdm greeter (gdmgreeter). It always try to start at a resolution of 1600x1200, so we had to change to the old greeter (gdmlogin) which detects properly the screen resolutions of the Xephyr sessions.

Maybe gdmgreeter uses xrandr to detect the resolution of every Xephyr session, since 1600x1200 is the max output reported by xrandr on every Xephyr session. The Xephyr windows are in fact resizable by means of xrandr, so we are not sure if this is a bug of xrandr that sould only report the current size, or a bug of gdmgreeter assuming that it must change the window size to the biggest available.


$ DISPLAY=:1 xrandr -q
Screen 0: minimum 160 x 160, current 1280 x 1024, maximum 1600 x 1200
default connected 1280x1024+0+0 (normal left inverted right x axis y axis) 0mm x 0mm
1600x1200 0.0
1400x1050 0.0
1280x960 0.0
1280x1024 0.0*
1152x864 0.0
1024x768 0.0
832x624 0.0
800x600 0.0
720x400 0.0
480x640 0.0
640x480 0.0
640x400 0.0
320x240 0.0
240x320 0.0
160x160 0.0


In order to avoid this problem, we use gdmlogin instead of gdmgreeter.

The Ubuntu 9.04 version of the multiseat setup, achieves some improvements over previous versions:
* Mouse wheel works properly.
* Keyboard led indicators are not messed up.

Resource: http://netpatia.blogspot.com

Related Links:


2009-10-11

Ubuntu 9.10 - Almost Perfect

ubuntu910bootI can be a rather harsh critic.

It’s been quite some time since I’ve given a really glowing review of any Linux Distro on the Computer Action Show (previously the Linux Action Show).

In fact, I’m pretty confident most people on the Fedora team view me as the biggest-jerk-face-ever for my — let’s just say… “not overly glowing” — reviews of recent Fedora releases. And I’ve given folks on the Ubuntu team a fairly hard time over the years as well.


Keep that in mind when I state the following:

Ubuntu 9.10 is as close to perfection as any version of Linux I have ever seen.

A little background: Back in May I wrote an article titled “The Perfect Linux Distro” where I laid out what I would view as, well, the perfect Linux distro.

And, while Ubuntu 9.10 certainly doesn’t implement everything I’d dreamed of in that article, they hit some of the key points. Let’s take a few minutes and go over the good and bad.

The Good Things in Ubuntu 9.10

ubuntu_software_center

The Ubuntu Software Center

The new Ubuntu Software Center is (or will be) a combination of Synaptic (the current Ubuntu package manager) and an Ubuntu-specific Software Store.

At present it is merely a standard interface for installing packages from the Ubuntu repositories… with a little nicer look and feel than Synaptic.

Canonical has set the goal of developers being able to sell their own commercial software from within the Software Center by the Ubuntu 10.10 release (next year).

This is huge. Services that allow users to find and purchase software for their platform (such as Apple’s iPhone App Store) have become an almost necessity to support a thriving software ecosystem. For me, as an independent software developer focusing on Linux, this is a really big freaking deal.

ubuntu910themeThemes / Icons

I know, most of you probably don’t care what the default theme is for your OS. But, whether we want to admit it or not, the initial look and feel is critical. This is the first impression people get for a new piece of software.

In the past, let’s be honest, Ubuntu was lacking in this area. It was… orange. And brown.

Orange and brown don’t exactly scream “advanced, super-attractive, cutting-edge software”.

Well, I have to say, Ubuntu really stepped up their game in 9.10. The new default “Human” theme is a smidge darker and a lot classier than what we previously were seeing. The older, brighter, more “orange-y” Human-Clearlooks theme is still available for those nostalgic for the old days.

On top of this, the default icon set is the new “Humanity” icon design. Which look fantastic. Polished. Modern. Nice, understated gradients.

Desktop Backgrounds

I feel almost a little silly including something as simple as “Desktop Backgrounds” here. I mean, it’s just pictures, right?

Well, if you’ve been using past versions of Ubuntu, you’ll know that it has typically only shipped with a very small selection of background pictures. We’re talking like 2 or 3.

Now, in 9.10, they have a respectable collection of nature and space backgrounds that look as nice and polished as any you’d find shipping with systems from Microsoft or Apple.

ubuntu-beta-install-12The Live-CD Installer

The installer for Ubuntu 9.10 has not changed significantly. Functionally it is roughly the same as the one we have had in both Ubuntu 9.04 and 8.10.

What they have done, however, is polish things up. The installer window now fits properly on smaller Netbook screens. And they’ve added a series of pictures that show you what you can do, with various applications within Ubuntu, as the installer progresses. Other software makers have been doing this for years (with varying degrees of class)… the Ubuntu team has done this very, very well.

This is a critical piece that has been missing — as many “non-nerd” users will not know to launch something called “F-Spot” to manage their photos. Now the installer helps these users over that initial learning curve.

New Instant Messaging Client

Pidgin has been the defacto IM software for many Linux distros for years now. However, it has stalled a great deal and was feeling a big long in the tooth.

It has been replaced by Empathy (which is something I recommended back in May and am incredibly happy to see this is the route they have gone down), which looks and works great.

Built-In Ubuntu One

Ubuntu One, a service that currently offers file storage and synchronization between different Ubuntu powered computers, has been in beta since earlier this year. With Ubuntu 9.10 this service is now shipping by default.

What’s so great about this? Two things:

  1. It’s a great piece of functionality that both Apple and Microsoft are providing in various forms for their customers.
  2. It provides a critical revenue stream for Canonical. (Which is kind of an important bit… considering the system itself is 100% free of charge.)

This, to me, is a sign of maturity. And I quite like the direction this (combined with the Ubuntu Software Center) is heading.

The Things Missing In Ubuntu 9.10

Notice I didn’t say “bad things”. Because, in my opinion, the main problem with Ubuntu 9.10 is that it’s missing a few key pieces of functionality.

yofrankie10The Games Are Weak

There are so many great, free games that could be included in Ubuntu.

Yo Frankie, Hedgewars and Frozen Bubble all are great open source games that could give a good representation of some of the great quality of games that are available.

Sure, shipping with a simple solitaire and sudoku game is great. But let’s step it up a notch!

Video Editing

I don’t fault Ubuntu for not having a built-in audio editing suite. Sure, I might use it, but it’s not something that most people are going to need.

But video editing? Windows and OS X both have their defacto tools to let people do at least basic video editing out of the box (or, at least, semi-out of the box).

Grab PiTiVi and either include it as a default application or make it a featured application to install. The lack of video editing on Linux is often given as a reason why people don’t “switch from Windows”… so take away that reason.

banshee-slide-podcastsBanshee

Rhythmbox is an okay music player and manager. That’s what Ubuntu ships with right now… and it does the job.

But it’s no Banshee.

Banshee is the bees-knees of music players. Make haste and get that application in there by default.

As you can see, not exactly a big list of “problems”!

Overall I’d call this release polished, smooth, easy to install and with an improved feature set (new applications that are incredibly promising).

Is it perfect? No. But so, so close.

I’d take it so far as to say I see very little reason that Ubuntu 9.10 would not be an excellent choice for the vast majority of computer users.

… Other than PC games. But that’s a different story…

by Lunduke.com

2009-10-10

Joomla 1.5 Upgrade

Upgrading Joomla 1.5 to the latest stable version

More information about this can be found in our tutorial on how to upgrade Joomla 1.5 to the latest version.

How to upgrade from Joomla 1.0.x to Joomla 1.5?

In this tutorial we will show you how to upgrade from Joomla 1.0.x to Joomla 1.5.x.

Important Note that it is highly recommended to backup your existing Joomla web site before you proceed with the migration process.


ImportantThe Joomla upgrade to 1.5 will preserve ONLY the content of your Joomla 1.0.x. No components/modules/plugins/templates you have will be available in the upgraded Joomla 1.5.

Step 1: Install the Migrator component

The first step is to install the Migrator component to your existing Joomla 1.0.x web site. You can download the Migrator component here.

More information on how to install a component in Joomla 1.0.x can be found in our Joomla 1.0 tutorial.

Once you have installed the Migrator component, you will be able to access it from the Components menu > Migrator.

The migrator component allows you to migrate your current Joomla 1.0.x data to the Joomla 1.5 database format.

Step 2: Create Migration SQL File

To proceed with the database migration click the Create Migration SQL File button located at the bottom of the Migrator component page:

Joomla 1.5 upgrade - SQL Migration success

The next step is to download the extracted SQL from your 1.0.x Joomla:

Joomla 1.5 upgrade - download the extracted SQL

You can now download your SQL dump by clicking on the Download link available on the right section of the page and upload it into your Joomla! 1.5 installation. Later, when importing this SQL file into your 1.5 installation, make sure to select Load Migration Script and use the prefix '_jos' (by default).

Step 3: Make a clean Joomla 1.5 installation

Next you should perform a manual Joomla 1.5 installation. For the purpose of this tutorial let's install Joomla 1.5 in a folder called dev.

Download the latest Joomla 1.5 package from the official website and extract it in the dev folder.

Open the dev folder by going to http://www.your-website.com/dev. You will see the Joomla start installation screen. Select your language, you should already have a database and user to fill them in.

Step 4. Perform the migration

Proceed with the installation until you reach Step 6: Configuration:

Joomla 1.5 upgrade - Step 6: Configuration

Fill the name of your web site, your admin e-mail and password details.

Important The key part here is to choose the Load Migration Script option:

Joomla 1.5 upgrade - Load Migration Script

Fill the old table prefix _jos and leave the encoding unchanged unless needed and you are familiar with this option.

By clicking on the [Browse] button you should select the Joomla 1.0.x migration dump you downloaded earlier.

Important Make sure to check the This script is a Joomla! 1.0 migration script. check box as well.

Proceed by clicking on the [Upload and execute] button.

Once the data is imported you should see the following screen:

Joomla 1.5 upgrade - Upload and execute

Click on the [Next] button near to the upper right corner.

Important You need to completely remove the installation directory.

Joomla 1.5 upgrade - Remove the installation directory

Now when you open the front end of your newly installed Joomla 1.5 you will see all the articles from the previous Joomla.


Wine 1.1.31 is out

The Wine development release 1.1.31 is now available.

What's new in this release (see below for details):
- Vastly improved monthcal control.
- Performance improvements for DIB sections.
- Several sound driver fixes.
- Beginning of ActiveX support in JScript.
- More Direct3D 10 work.
- More 16-bit dlls split off to separate modules.
- Support for attachments in MAPI.
- Various bug fixes.

The source is available from the following locations:

http://ibiblio.org/pub/linux/system/emulators/wine/wine-1.1.31.tar.bz2
http://prdownloads.sourceforge.net/wine/wine-1.1.31.tar.bz2

Binary packages for various distributions will be available from:

http://www.winehq.org/site/download

You will find documentation on http://www.winehq.org/site/documentation

You can also get the current source directly from the git
repository. Check http://www.winehq.org/site/git for details.

Wine is available thanks to the work of many people. See the file
AUTHORS in the distribution for the complete list.

----------------------------------------------------------------

Bugs fixed in 1.1.31:

1660 Worms 2 demo crashes on startup
3044 CSpy/Date and Time Picker: selection of commas or weekday
3853 Freelancer: music hangs
5055 Deleting files from a window in wine doesn't send them to the Trash
5764 Running FFXI leaves blank screen after accepting user agreement.
6967 CSpy/Month Calendar: Wrong date gets selected
6969 CSpy/List View: Cannot select multiple items with mouse
7768 server should set process affinity
9989 Oracle OCI client: Hangs on updating LOB data
9995 font/menu problems
10050 oleaut32 and ITypeInfo::Invoke arguments
11385 Everquest 2 patcher window has transparency/drawing regression
11447 Solver addin in excel 2003 gives an "Out of Memory" error
11542 Proteus Demo crashes/hangs early
12349 DSOUND_MixInBuffer Assertion `dsb->buf_mixpos + len <= dsb->tmp_buffer_len' failed
12816 Age of Conan crashes
12859 HideThreadFromDebugger in NtSetInformationThread
13024 Regressions in Trackmania Nations Forever
13247 Emperor - Rise of the middle kingdom runs slowly w/o virtual desktop
15322 Add smartcard functionality
15812 3DS MAX 7.0: Any attempt to change viewport configuration results in a crash
15828 Microsoft Games for Windows - LIVE Redistributable setup - blank EULA
15936 Rollercoaster Tycoon 3 : crashes when start up
16525 Angels Online: Black screen in windowed mode.
16658 Scratchiness of sound in aimp 2.5 and other audio players
17096 Visual C++ 2005 Trial can't build project, complains when starting mspdbsrv
17532 Satori Bulk Mailer - adding modules fails
17581 Steam will not begin installation, segmentation fault, perhaps
17674 wine recaching font metrics on every run
18040 Mass Efffect crashes
18364 utorrent with an https tracker url stops working
18423 UPnP port mapping in uTorrent stopped working
18500 ntdll.NtQueryInformationProcess: provide simple ProcessDebugObjectHandle info class handling, returning "no debugger"
18660 .NET 3.0 WPF requires SystemParametersInfoW( SPI_GETDROPSHADOW) handled
18716 .NET 3.0 WPF requires SystemParametersInfoW( SPI_GETMOUSEVANISH) handled
18921 O(n) hash_table_add causes winedbg to take 20 minutes to dump stack when chromium crashes
19270 Dragon NaturallySpeaking 10 Standard freezes after selecting alsa in winecfg
19365 [Monkey Island Special Edition] Screen is cropped to a small part.
19369 C&C3 and Kane's Wrath crash with DSOUND_BufPtrDiff assertion
19380 SysDateTimePick32 - wDayOfWeek not generated automatically after DTM_SETSYSTEMTIME
19559 Proteus: Component text is too big
19578 Ares (Proteus 7.5) exits silently
19620 CounterStrike Source: Cannot perform microphone test (or use mic)
19851 interlocked* functions unimplemented for ARM
19897 d3d10/dxgi: device.ok crashes on MacOS X (InitAdapters/glGetString)
19901 Burg Schreckenstein: OSS HW emulation plays too slow and crashes
19963 GetSystemTimeAdjustment() should return 10000000 / sysconf(_SC_CLK_TCK)
19977 runasdate: buggy comctl32 behavior
19994 Microsoft Security Essentials Setup crashes missing __uncaught_exception
20094 messui.exe: instantly crashes
20121 Cities XL Demo fails to run
20153 AutoCAD 2008: Icons in popup menus too big
20159 EVE Online crashes on Character selection screen
20169 Jedi Knight: MotS freezes randomly after videos.
20253 WWII Online: Battleground Europe crashes
20258 Imperium Romanum crashes on startup
20270 Open file dialog in Winamp not resizable
20290 Crash when opening Splinter Cell Pandora Tomorrow or Chaos Theory's multiplayer mode

Puppy linux 4.3....puppy is growing up..


http://www.youtube.com/user/sneekylinux

2009-08-28

Yahoo messenger with wine on Ubuntu

Details:
OS: Ubuntu 9.04, 2.6.28-14 kernel
Wine: 1.1.26. Installed along with wine-gecko.

Steps-by-step.
1. Install wine. I used version 1.1.26 but I think older will also do. (You can download from here)


2. Open up a terminal and run the winecfg command. It will set up the wine environment on the current user. Full path is: /home/$username/.wine/drive_c . Press cancel afterwards.

3. Install Macromedia flash player 9. Go to oldversion.com and search for it there. Then install it using wine flash9p.exe

4. Download from here and import the ym9.reg. Change the overrides to "Native then Builtin" and mpr.dll to Builtin. Use regedit import ym9.reg .

5. Copy the dlls to /home/$username/.wine/drive_c/windows/system32 folder (list is here). In the list proposed by Patriot there were some folders .. x86_[big name]. I did not use those. Also I got my dlls from XP only.

6. Get the yahoo web installer. I used that because it also installs flash 10, which is also needed. Use wine msgr9us.exe. If the install progress hangs, just press CTRL+C in the terminal and run again the installer.

7. Have fun. If you're a girl, send me a kiss and think about me when you're sleeping Laughing

Waiting for reviews.

Tip: If the flash ads do not load then most probably ym will crash. Reinstall or restart pc (yeah.. i know... Rolling Eyes ).

Patriot wrote:

Q1. How to gain access to main menu ?
A1. Click on the desired ym window and press alt key or if you know the menu shortcut then press alt+menu_shortcut (ex: alt+m in main window).

Q2. I get black bar in main window ?
A2. Alphablending not fully working in wine. Set your contacts to compact list.

Q6. How do I close/minimize the IMwindow ?
A6. The (wine botched) skinning makes the hotzones a little off. Move your mouse a little lower to get the min/max/close button highlighted. Using the taskbar also works.


Working: Buzz, IMVironment, Audibles, Fonts, Smileys, Avatars, Photo Sharing, Archive, Webcam, Calling.

Known Bugs:
- When trying to add a new contact to your list, ym will crash.
- Games require java. Try installing that and see if they work.

Everything else not tested.

Source: http://www.murga-linux.com/puppy/viewtopic.php?p=335770#335770

2009-05-16

How to assign a drive letter on Windows XP

To assign a drive letter to a drive, a partition, or a volume, follow these steps:
  1. Log on as Administrator or as a member of the Administrators group.
  2. Click Start, click Control Panel, and then click Performance and Maintenance.

    Note If you do not see Performance and Maintenance, go to step 3. Performance and Maintenance appears in Control Panel only if you use Category view. If you use Classic view, Performance and Maintenance does not appear.
  3. Click Administrative Tools, double-click Computer Management, and then click Disk Management in the left pane.
  4. Right-click the drive, the partition, the logical drive, or the volume that you want to assign a drive letter to, and then click Change Drive Letter and Paths.
  5. Click Add.
  6. Click Assign the following drive letter if it is not already selected, and then either accept the default drive letter or click the drive letter that you want to use.
  7. Click OK.
The drive letter is assigned to the drive, to the partition, or to the volume that you specified, and then that drive letter appears in the appropriate drive, partition, or volume in the Disk Management tool.

2009-05-05

Yahoo messenger on linux

Yahoo messenger can't install on linux. Pidgin etc. messengers can't support video and voice call.
I'm informing you that ekiga is can do voice call to yahoo messenger. And messenger gYachi is supports camera.

How to call to Yahoo messenger from Linux by ekiga
1. Configure your ekiga.
for beginners register an account through http://ekiga.net, ekiga setup wizard will guide you through the process. but any sip account/provider will do.


2. Calling a yahoo messenger user
now you can call a yahoo messenger user, by just typing the username in the sip address bar like this someuser_at_yahoo.com@yahoo.gtalk2voip.com or someuser%yahoo.com@yahoo.gtalk2voip.com ie john_at_yahoo.com@yahoo.gtalk2voip.com or john%yahoo.com@yahoo.gtalk2voip.com

3. The catch: yahoo messenger user must accept a buddy invitation from gtalk2voip
submit the YM username to www.gtalk2voip.com
the YM user must accept the buddy invitation from gtalk2voip service in order to recieve the call from your sip network. so before calling, advice user to accept the invitation the name of gtalk2voip buddy will look like this gtalk2voipXXX@yahoo.com where XXX is a number, ie gtalk2voip005@yahoo.com after the user accepts the invitation, he/she can answer your call and the next time you call.

* the YM user can always remove the gtalk2voip buddy if the user wishes not to recieve calls through this gateway

* This howto is also apliccable to any sip based softphones
gizmo even integrates this service with version 3.0 and perhaps onwards.

* the service is free
(This how to is from: http://ubuntuforums.org/archive/index.php/t-414121.html)

How to install gYachi
1. Open sources.list
sudo gedit /etc/apt/sources.list

2. Add this lines. Then save and close:
deb http://ppa.launchpad.net/loell/ubuntu jaunty main
deb-src http://ppa.launchpad.net/loell/ubuntu jaunty main

3. Accept PGP key by this commands:
sudo apt-key adv --recv-keys --keyserver keyserver.ubuntu.com 0xc23b005d874996dc8d03a3c0d0d3c959db2035a6
sudo apt-get update

4. Now you can install gYachi
sudo apt-get install gyachi

OK now go to Applications -> Internet -> gYachi Emproved

Yahoo messenger smileys for pidgin
Click here

Enjoy ;)

2009-04-29

Photoshop CS4, Dreamweaver CS4, Corel Draw X3 on Ubuntu with wine


Running Photoshop CS4, Dreamweaver CS4, Corel Draw X3 portable on Ubuntu with wine.

HOWTO:
Installation currently fails under wine versions later than 1.1.17
Hence, the applications was installed using 1.1.17, not 1.1.20.

Installing has to be done in an earlier wine version, 1.1.17 (or perhaps 1.1.16).
The exceptions being that one more thing is needed for the install to work properly, winetricks ie6 and that I used the 1.1.17 version.

Here follows the shamelessly stolen and edited installation guide:
1. If you have used wine before, please start of with a clean .wine folder. Or bottle you Photoshop by doing every action with a specific wineprefix.
2. Install Wine 1.1.17 from http://wine.budgetdedicated.com/archive/index.html
3. Download winetricks and install necessary libraries. Also make sure you have a decent driver for your graphics card installed.

wget http://www.kegel.com/wine/winetricks
sh winetricks msxml6 gdiplus gecko vcrun2005 ie6
sudo apt-get install msttcorefonts

3. LANG=C before the following command like this:
LANG=C wine Setup.exe
4. To fix the text-layer bug, put atmlib.dll in “~/.wine/drive_c/windows/system 32″. You can download it from several places if you search it on google.
5. Install Wine 1.1.20 from http://wine.budgetdedicated.com/archive/index.html(or your package manager), to fix the menu bar bug.
6. Try running.

You can delete /home/[USER]/.wine/drive_c/Program Files/Common Files/Adobe/Updater6/Adobe_Updater.exe to stop adobe updater (or unselect it during installation way down in the unexpanded list)

I am not sure why, but on my screen I had to change the UI font size(preferences->interface->UI Font size) to "medium" in the application, or else it would look quite crappy. After that, it looked great!

I have only tried with clean .wine-directories, but it might work with used ones as well.
I also had some problems seeing the checkboxes during installation, but it was pretty easy to find them(after some clicking).

I copied this post from appdb.winehq.org . Thank you for Nicklas Börjesson.
I tried it on Ubuntu 8.04, 8.10 and 9.04 ;)

To run coreldraw X3 portable you need to copy mfc40.dll to wine system32 folder.

That's it! Enjoy ;)

If you have an any problem please comment here.

I'm sorry for my English is not good enough.

I love ubuntu

Hello world! it's a test. I love ubuntu :D

Hello World :-)

Starting blog in English. Here will be write about open source programs etc.
My English is not good. Although I'm study now. :)

"Dusal" is meaning Drop in Mongolian language. We are the one drop of knowledge ocean. If going together we will be an ocean. Let's go together.

Search Results